In this tutorial we will teach you implemention of Bootstrap Tables. as we know Bootstrap is very popular open source project that provides us more option in web desighn. Bootsrap is a CSS based framework that can easily integrated with minimum customization. In web desighn we have a tendency to needed to populated data in structured table manner that can easily be search, sort. Bootstrap Datatable is just like a table that can easily integrated with Bootstrap table styling option. This article we use PHP to get Data from MySQL Database and will be Displayed in Bootstrap table. You can Create tables with basic styling that has horizontal dividers and small cell padding by just adding the Bootstrap’s class “.table” to the <table> element. and you can create table with alternate background like zebra-stripes by simply adding the class “.table-striped” to the “.table” base class. with bootstrap you can create responsive tables to enable horizontal scrolling on small devices “screen width under 768px”. viewing responsive tables on other devices having screen width larger than 768px, you will not see any diffrence. To make any table responsive just place the table inside a <div> element and apply the class “.table-responsive” on it.
How to use bootstrap tables to Display data from MySQL using PHP
Getting Bootsrap
Bootstrap can be Download to your needs from their Getting Started page but i would prefer using the CDN option, because it is faster also it is advised to go through and get yourself accustomed with some bootstrap terms, including common classes. This page also some Examples of how to use Bootstrap classes.
Adding Bootstrap Library
after download bootstrap we need to bootstrap library file in your page and in this step we going to add library file.
<link type="text/css" href="css/bootstrap.min.css" rel="stylesheet">
<link type="text/css" href="css/bootstrap-table.css" rel="stylesheet">
<link type="text/css" href="css/font-awesome.css" rel="stylesheet">
<script src="js/bootstrap.min.js"></script>
<script src="js/bootstrap-table.js"></script>
<script src="js/jquery-1.11.1.min.js"></script>
1-Creating Database
- Open Phpmyadmin in your Browser
- Click on Database Tab Display on Top side
- Give the Database name “test”.
- After Creating Database Open it.
- Click on SQL Tab on Top area
- Copy the Below Source Code and paste it.
- Then Click on Go.
-- phpMyAdmin SQL Dump
-- version 4.5.1
-- http://www.phpmyadmin.net
--
-- Host: 127.0.0.1
-- Generation Time: Oct 12, 2016 at 09:38 PM
-- Server version: 10.1.13-MariaDB
-- PHP Version: 7.0.8

SET SQL_MODE = "NO_AUTO_VALUE_ON_ZERO";
SET time_zone = "+00:00";


/*!40101 SET @OLD_CHARACTER_SET_CLIENT=@@CHARACTER_SET_CLIENT */;
/*!40101 SET @OLD_CHARACTER_SET_RESULTS=@@CHARACTER_SET_RESULTS */;
/*!40101 SET @OLD_COLLATION_CONNECTION=@@COLLATION_CONNECTION */;
/*!40101 SET NAMES utf8mb4 */;

--
-- Database: `test`
--

-- --------------------------------------------------------

--
-- Table structure for table `user`
--

CREATE TABLE `user` (
  `id` int(11) NOT NULL,
  `fname` varchar(255) NOT NULL,
  `lname` varchar(255) NOT NULL
) ENGINE=InnoDB DEFAULT CHARSET=latin1;

--
-- Dumping data for table `user`
--

INSERT INTO `user` (`id`, `fname`, `lname`) VALUES
(6, 'Deepak ', 'Raj'),
(7, 'Priyanshu', 'Singh'),
(8, 'Abhi ', 'Singh'),
(9, 'Saddam', 'Khan'),
(10, 'Priya', 'Raj'),
(11, 'Praveen Singh', 'Singh'),
(12, 'Aman', 'Yadav'),
(13, 'Aryan ', 'Singh'),
(14, 'Lucky', 'Yadav'),
(15, 'Mohit ', 'Tiwari'),
(16, 'Pappu', 'Kumar'),
(17, 'Nidhi ', 'Mishra'),
(18, 'Ayesha', 'Singh');

--
-- Indexes for dumped tables
--

--
-- Indexes for table `user`
--
ALTER TABLE `user`
  ADD PRIMARY KEY (`id`);

--
-- AUTO_INCREMENT for dumped tables
--

--
-- AUTO_INCREMENT for table `user`
--
ALTER TABLE `user`
  MODIFY `id` int(11) NOT NULL AUTO_INCREMENT, AUTO_INCREMENT=19;
/*!40101 SET CHARACTER_SET_CLIENT=@OLD_CHARACTER_SET_CLIENT */;
/*!40101 SET CHARACTER_SET_RESULTS=@OLD_CHARACTER_SET_RESULTS */;
/*!40101 SET COLLATION_CONNECTION=@OLD_COLLATION_CONNECTION */;
OR Import DB File
After Downloading the source code extract it in your root folder.
- Open Phpmyadmin in your Browser
- Click on Database Tab Display on Top side
- Give the Database name “test”.
- After Creating Database Open it.
- Click on Import Tab on Top area
- You can Find Db file in Downloaded source code Select it.
- Then Click on Go.
2- Creating Database Connection
After import Database File then next step is creating database connection using php copy the below code and save it is as “db.php”.
<?php


$con = mysqli_connect("localhost","root","","test");
 // Check connection
if (mysqli_connect_errno()) {
  echo "Failed to connect to MySQL: " . mysqli_connect_error();
}


?>
3 – Creating Table using Bootstrap
This step we are going to create Bootstrap table and display data from mysql database.
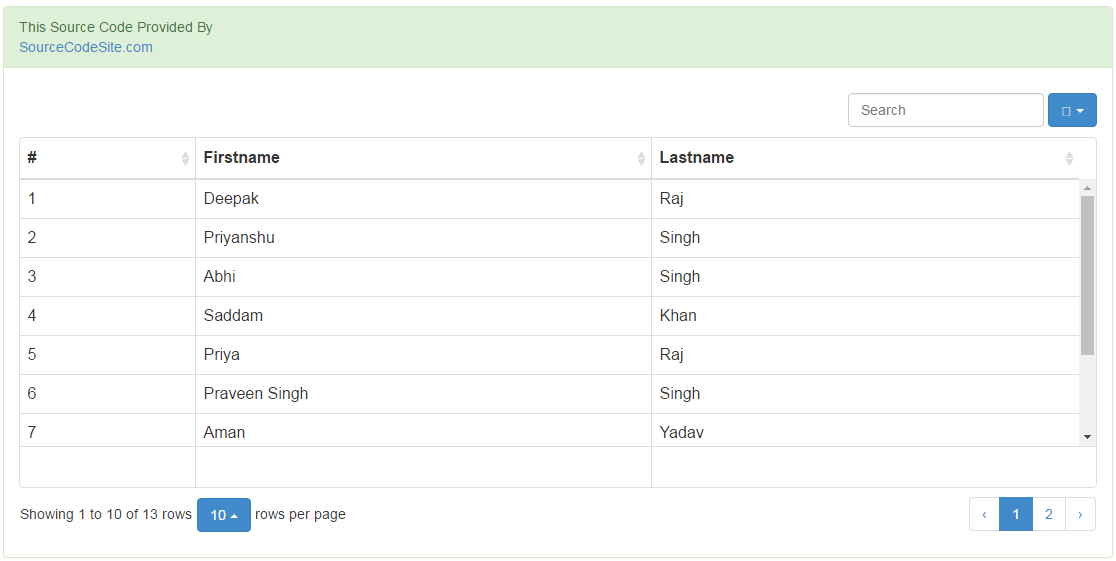
<div class="container">
	<div class="col-md-12">
		<div class="page-header">
			<h1>
				How to use bootstrap tables to  Display data from MySQL using PHP
			</h1>
		</div>


		<div class="panel panel-success">
			<div class="panel-heading ">
			<span class=""> This Source Code Provided By<br>
			<a href="http://sourcecodessite.com">SourceCodeSite.com</a> </span>

			 </div>

			<div class="panel-body">
				<div class="row">
					<div class="col-md-12">

						<table 	id="table"
			                	data-show-columns="true"
 				                data-height="460">
						</table>
		</div>
	</div>
</div>
</div>
</div>
</div>
4 – Creating jQuery Script for Search, Pegination and More
This step we are going to create script in jQuery for display data, Search data, Pegination and Sort.
<script type="text/javascript">

	 var $table = $('#table');
		     $table.bootstrapTable({
			      url: 'list-user.php',
			      search: true,
			      pagination: true,
			      buttonsClass: 'primary',
			      showFooter: true,
			      minimumCountColumns: 2,
			      columns: [{
			          field: 'num',
			          title: '#',
			          sortable: true,
			      },{
			          field: 'first',
			          title: 'Firstname',
			          sortable: true,
			      },{
			          field: 'last',
			          title: 'Lastname',
			          sortable: true,

			      },  ],

  			 });

</script>
5 – Getting Data From MySQL Database using PHP
This step we are going to fetch data from mysql database using php.
<?php
	require 'db.php';

 		$sqltran = mysqli_query($con, "SELECT * FROM user ")or die(mysqli_error($con));
		$arrVal = array();

		$i=1;
 		while ($rowList = mysqli_fetch_array($sqltran)) {

						$name = array(
								'num' => $i,
 	 		 	 				'first'=> $rowList['fname'],
	 		 	 				'last'=> $rowList['lname']
 	 		 	 			);


							array_push($arrVal, $name);
			$i++;
	 	}
	 		 echo  json_encode($arrVal);


	 	mysqli_close($con);
?>
Preview
If you facing any type of problem with this source code then you can Download the Complete source code in zip Formate by clicking the below button Download Now otherwise you can send Comment.
Dear Colleagues,
Great program!
Although I having some trouble because I want to update the width and it is not possible. I also want to customize the font-size and i don´t know how to do it.
Any help, please,
thank you
Thanks so much for giving me this idea
Hi,
Thanks for the tutorial.
It’s helping me a lot.
I want to place list-user.php in a seperate folder.
How can i link to the file in the script?
Great!!
Thanks for the tutorial.
It’s helping me a lot.
Thanks for the code. How can I add Buttons in the table? I tried it with:
{ class: ‘btn btn-success’, }
It doesn’t work if I add more than one Button and the Button doesn’t have a description.
Hello, this worked for me as expected, thank you very much. Although I have an issue and need suggestion. I wanted to adjust width of the columns they are not aligning properly. I looked into solutions but couldn’t find any. I will be thankful if you can provide any suggestions with the same source code. Thank you again
Hi,
I have tried downloading the source code for this project with no luck, when I click on the download link it just takes me to a list of other project, do you have to be a member to download.
plz check it, it’s recoverd